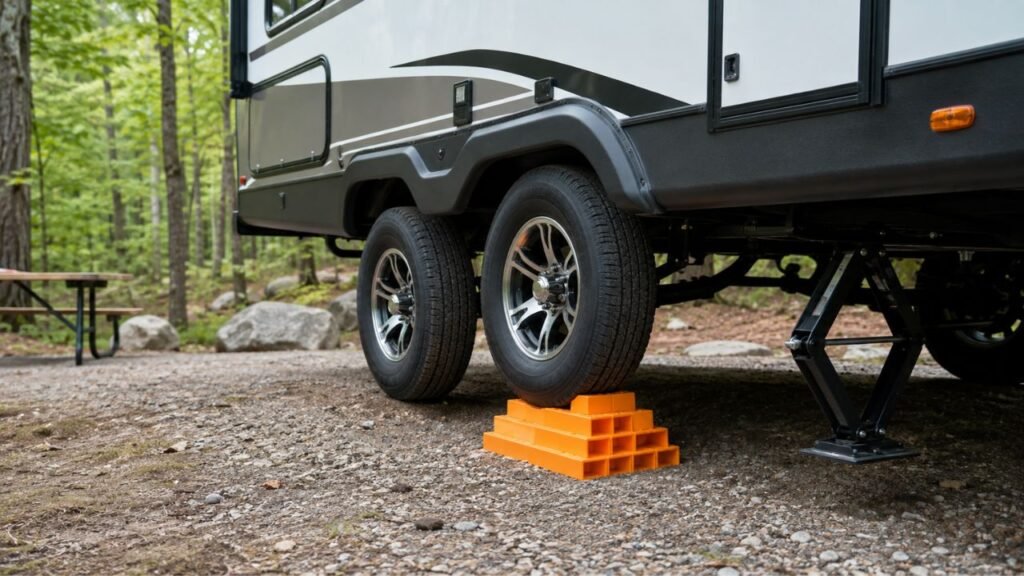
Most RV leveling blocks should only be stacked about 4 to 5.5 inches high, depending on the block design and manufacturer. Never assume every set has the same limit. If you need several inches of lift, build the blocks into a wide stepped pyramid instead of creating a narrow vertical tower.
Below, I’ll show you how high is usually safe, how to build the stack correctly, and what to do when your campsite needs more lift than your blocks can safely provide.
Disclaimer: This information is general guidance and not a substitute for manufacturer instructions.
Always follow your RV and leveling block manufacturer’s specifications.
Key Takeaways
- Most RV leveling block systems allow roughly 4 to 5.5 inches of lift.
- Your leveling block manufacturer’s stated maximum should always come first.
- Never build a narrow vertical tower beneath an RV tire.
- Build interlocking blocks into a wide, stepped pyramid when required.
- Keep the tire properly supported and centered on the upper platform.
- Soft ground can make even a normally safe stack unstable.
- If you need extreme lift, repositioning the RV is usually safer.
- Never assume instructions for tire leveling also apply to hydraulic jacks.
How High Can You Safely Stack RV Leveling Blocks?
There isn’t one maximum RV leveling block height that applies to every product. Block thickness, shape, interlocking design, weight rating, and intended use can all affect the safe stacking limit.
For most common RV applications, I would treat about 4 to 5.5 inches as the general range, while still checking your particular leveling blocks before stacking them that high.
| Leveling Setup | Typical or Published Lift Range | What You Should Know |
| Common interlocking plastic blocks | About 4–5.5 inches | Maximum varies by manufacturer |
| Some stackable block systems | Around 4.5 inches | Do not exceed the listed maximum |
| Some pyramid-style systems | Up to about 5.5 inches | Proper configuration is required |
| Curved leveling ramps | Up to about 4 inches | Height is adjusted by tire position |
| Blocks beneath RV jacks | System-dependent | Follow jack and RV instructions |
The important point here is that four blocks do not automatically equal four inches.
Some blocks overlap or interlock when stacked. Others have raised edges or different thicknesses. Count actual lift rather than simply counting pieces.
When in doubt, check the instructions supplied with your blocks. Your RV owner’s manual may also contain limitations you need to follow.
Why You Shouldn’t Stack RV Leveling Blocks Too High
A leveling block may be strong enough to support substantial weight. That doesn’t mean an extremely tall stack will remain stable underneath a moving RV.
Taller Stacks Become Less Stable
As the stack becomes taller, small positioning errors become more important.
A short, wide platform keeps the tire relatively close to the ground. A tall stack raises the tire and creates more opportunity for sideways movement.
This becomes especially concerning if the bottom surface isn’t completely flat.
Loose gravel, sloping pavement, soft soil, or hidden rocks can allow one side of the stack to settle.
The taller the stack becomes, the more noticeable that movement can be.
The Blocks Can Shift While You Drive Onto Them
Remember that the leveling blocks aren’t only supporting the RV after you park.
Your tire also has to climb onto them.
That puts forces through the blocks while the vehicle is moving. A poorly constructed stack can separate, slide, or twist as the tire climbs.
This is why I don’t recommend simply stacking several blocks directly on top of each other beneath a tire.
Create a gradual approach whenever your leveling block system calls for one.
Blocks Can Crack, Bend, or Sink
Plastic leveling blocks don’t last forever.
Age, UV exposure, previous overloading, freezing temperatures, rocks, and repeated use can weaken them.
Inspect your blocks whenever you’re setting up camp.
Don’t use one if you notice:
- Cracks around the edges
- Broken interlocking tabs
- Significant bowing
- Deep cuts or gouges
- Pieces missing from the grid
- Permanent distortion
Also check underneath the stack.
A small rock pushing against one section can concentrate weight in an area the block wasn’t designed to handle.
The Tire Can Roll or Slip Off the Stack
Another problem with extreme height is tire positioning.
Your tire needs a stable landing area once you’ve reached the required height.
If you’ve created a narrow top platform just to gain another inch, you’re making the setup less forgiving.
I’d rather reposition the RV than leave a heavy trailer tire perched awkwardly on a tiny platform.
Should RV Leveling Blocks Be Stacked in a Pyramid?
Most interlocking drive-on leveling blocks designed for stacking should be arranged as a stepped pyramid or ramp, particularly when more than a small amount of lift is required. Always follow the pattern recommended by your particular block manufacturer.
What a Proper Pyramid Stack Looks Like
Think of the setup as a small staircase.
The lowest layer forms the widest foundation. The next layer starts farther forward. Additional layers gradually increase the height until you reach your landing level.
That gives the tire a smoother route upward.
For example, a basic setup might resemble this:
Ground → first step → second step → upper landing
The exact number of blocks required will depend on their size and interlocking design.
Don’t assume that a three-level pyramid only needs three blocks. The bottom layer usually requires several pieces because it needs to support the layers above it.
Why a Straight Vertical Tower Is a Bad Idea
A straight tower works poorly beneath an RV tire because the tire can’t properly climb onto it.
Even if you manage to position the tire on top, the supporting footprint underneath may be unnecessarily narrow.
A stepped design spreads the load across a larger area.
It also reduces the sudden height change the tire encounters while you’re parking.
If your leveling block manual shows a pyramid arrangement, follow it carefully rather than improvising your own tower.
How Many Leveling Blocks Do You Need for Each Inch of Lift?
You can’t reliably calculate leveling height by assuming one block equals one inch. Different products use different thicknesses, lips, grids, and interlocking arrangements.
Keep these points in mind:
- Check the effective lift listed by the manufacturer.
- Account for overlapping or interlocking sections.
- Remember that a pyramid needs several blocks per level.
- Tandem-axle trailers usually require more blocks.
- Wider tires may require wider platforms.
- Carry extra blocks rather than planning around the absolute minimum.
For example, a block may physically be more than an inch thick but provide less additional height once it’s interlocked with the layer underneath.
That’s why I recommend measuring your own block setup at home before your trip.
You can build a two-, three-, and four-level configuration on a flat driveway and measure each one.
Then you’ll know approximately how much correction each arrangement provides when you reach the campground.
How to Stack RV Leveling Blocks Safely
Good leveling starts before the tire touches a block. Take a minute to inspect the campsite and determine whether your planned stack makes sense.
- Park close to your final position.
Choose the flattest practical part of the campsite. - Check which side is low.
Use your RV’s level or leveling system. - Estimate the required lift.
Don’t start adding blocks without knowing roughly how much correction you need. - Inspect the ground.
Remove rocks, sticks, and debris beneath the blocks. - Check your manufacturer’s limit.
Make sure the required height remains within the approved range. - Build a stepped configuration.
Use the pattern recommended for your particular blocks. - Align the blocks with the tire.
The tire should approach the center of the ramp. - Drive onto the blocks very slowly.
Avoid sudden throttle inputs. - Stop with the tire securely positioned.
Don’t leave it partly off the landing area. - Set the parking brake when appropriate.
Follow the procedure for your motorhome or tow vehicle. - Install wheel chocks correctly.
Don’t depend on leveling blocks to stop rolling. - Recheck everything.
Confirm the RV is level and the blocks haven’t shifted.
If something looks wrong, drive back down and rebuild the stack.
Trying again is much better than accepting an unstable setup because you’re tired after arriving at camp.
Does the Whole RV Tire Need to Sit on the Leveling Block?
Your RV tire should have adequate support across the tread and sit securely on a leveling surface designed for its width. I wouldn’t intentionally leave a significant portion of the tire hanging beyond a narrow block.
A little variation can occur depending on the tire and leveling product.
However, the goal should always be stable, even support.
Make sure your leveling blocks are wide enough for your tires before relying on them.
This becomes particularly important with:
- Wide trailer tires
- Large motorhome tires
- Dual rear wheels
- Heavy fifth wheels
If your tire is much wider than the block you’re using, consider a wider leveling system rather than forcing the setup to work.
What About Tandem-Axle Travel Trailers?
Tandem-axle trailers require a little more planning because you’re working with two closely spaced tires on the low side. Your blocks need to provide proper support without interfering with either tire.
Level Both Tires on the Low Side Correctly
When raising one side of a tandem-axle trailer, use a leveling arrangement intended for that axle configuration.
You will generally need enough blocks to create stable platforms beneath the tires involved.
Don’t concentrate on simply reaching your target height.
Both tire position and overall stability matter.
Before your first trip, check whether your blocks physically fit between your trailer tires.
Some tandem axle spacing is tight enough that large ramp systems may be difficult to position.
Don’t Sacrifice Tire Support to Gain More Height
You may be tempted to make the upper platform narrower because space is limited between tandem tires.
Be careful with that approach.
Getting another inch higher isn’t worthwhile if it leaves a tire poorly supported.
If the blocks don’t fit correctly, use a leveling system better suited to your trailer’s axle spacing.
Can You Stack Leveling Blocks Under RV Jacks?
Blocks are commonly placed beneath different RV jacks, but tire leveling, stabilizing, and jack support aren’t automatically the same thing. Check the instructions for the specific jack and block combination you’re using.
Under Stabilizer Jacks
Blocks or jack pads can often be placed beneath stabilizer jacks when the equipment manufacturer allows it.
Doing this can shorten how far the stabilizer needs to extend.
It can also create a larger footprint on certain surfaces.
However, remember what stabilizer jacks are designed to do.
They primarily reduce movement after the RV has been leveled.
Don’t automatically use stabilizer jacks to lift a trailer simply because you need another inch of leveling.
Under Tongue or Landing Jacks
Heavy-duty blocks are also commonly used beneath tongue jacks and fifth-wheel landing gear.
Using the proper support can reduce jack extension.
Still, the block needs to be:
- Properly rated
- Stable on the ground
- Large enough for the jack foot
- Positioned directly beneath the load
- Approved for that type of use
Never balance a tongue jack on a narrow pile of miscellaneous pieces.
Under Hydraulic or Automatic Leveling Jacks
Be more cautious with automatic leveling systems.
Don’t assume that because your tire blocks can safely stack five inches, you can build the same five-inch tower beneath a hydraulic jack.
Automatic leveling systems can have their own operating requirements.
Some manufacturers allow approved pads or blocks. Others limit how blocks should be used.
Follow the instructions for your particular leveling system and RV.
What Should You Do If Your RV Needs More Than 4–5 Inches of Lift?
If you’re approaching the maximum height allowed by your leveling blocks and the RV still isn’t level, don’t automatically keep stacking. There are usually safer ways to solve the problem.
Reposition the RV First
This is usually my first move.
Sometimes moving forward just two or three feet completely changes the required correction.
Try:
- Moving forward slightly
- Backing up slightly
- Parking farther to one side
- Reversing your orientation when practical
- Choosing another section of the campsite
A campsite can look evenly sloped while actually having several small dips.
Moving the tires away from one depression might save you several inches of leveling height.
Consider a Purpose-Built Leveling Ramp
Curved or wedge-style leveling ramps can make small-to-moderate adjustments easier.
You drive onto the ramp until the RV reaches level, then secure the setup according to the product instructions.
These can reduce the trial-and-error involved with individual blocks.
However, ramps also have maximum lift and weight limits.
They aren’t a license to raise the RV indefinitely.
Can You Use 2×6 or 2×8 Lumber?
Yes, many RV owners use properly sized lumber for leveling.
Solid boards can create wide tire-supporting platforms when they’re in good condition and arranged correctly.
If you use wood, choose pieces that are:
- Wide enough for the tire
- Long enough for a gradual approach
- Free from serious cracks
- Strong enough for the load
- Flat and stable
Pressure-treated lumber generally holds up better around wet campsites.
You can also bevel the approach end of a board to make driving onto it easier.
What I don’t recommend is stacking random short scraps into a tall wooden tower.
Wood isn’t automatically safe simply because plastic blocks have reached their limit.
Know When the Campsite Is Simply Too Uneven
There comes a point where the best leveling solution is finding another position.
If you need six, seven, or eight inches of correction and your equipment wasn’t designed for it, reconsider the campsite setup.
An extremely tall stack can create more problems than a slightly different parking location.
There’s no prize for leveling an RV on the steepest possible spot.
Can You Stack RV Leveling Blocks on Gravel, Dirt, or Soft Ground?
You can use many RV leveling blocks on gravel or dirt, but the surface beneath them must remain firm enough to support the load. A safe stack height on concrete may behave differently on soft campground soil.
Before positioning your blocks:
- Remove large rocks beneath them.
- Clear sticks and other debris.
- Flatten loose gravel when possible.
- Avoid muddy or saturated soil.
- Watch for soft depressions.
- Use suitable support pads where recommended.
- Recheck the blocks after the RV settles.
Pay extra attention after heavy rain.
Ground that felt solid when you arrived may soften overnight.
If one corner of the stack starts sinking, don’t simply add another block on top to compensate.
Move the RV off the blocks and correct the foundation first.
How Do You Know Your Leveling Block Stack Is Too High?
Sometimes the problem is obvious before you even measure the stack. If the setup makes you uncomfortable when you look at it, investigate before driving onto it.
Warning signs include:
- You’ve reached the manufacturer’s maximum height.
- The stack resembles a tower instead of a ramp.
- The bottom layer has a narrow footprint.
- The blocks move while the tire climbs.
- The tire can’t sit securely on top.
- One side of the stack rocks.
- Blocks are visibly cracking or bowing.
- Part of the stack is sinking into the ground.
- You need random materials to gain more height.
- The RV still needs several inches after reaching the rated limit.
Don’t try to rescue an unsafe setup with extra pieces.
Back down and find a better solution.
Common RV Leveling Block Mistakes to Avoid
Leveling blocks are simple equipment, but a few mistakes can make them unreliable. Avoid these common problems whenever you’re setting up camp:
- Stacking blocks straight upward under a tire
- Exceeding the manufacturer’s maximum height
- Assuming every block adds exactly one inch
- Building on loose rocks
- Using cracked or damaged blocks
- Driving onto the blocks too quickly
- Allowing the tire to sit poorly supported
- Forgetting to chock the wheels
- Using stabilizer jacks as primary lifting jacks
- Confusing tire-block limits with jack-pad limits
- Using blocks with insufficient load capacity
- Continuously adding height when the ground underneath is sinking
A couple of extra minutes during setup can prevent damaged blocks, damaged tires, or a dangerous campsite situation.
Final Words
So, how high can you stack RV leveling blocks? For most common systems, roughly 4 to 5.5 inches is a useful general range. However, your actual maximum should always come from the manufacturer of the leveling blocks you’re using.
Focus on stability rather than simply reaching the perfect bubble level. Build a wide stepped platform, support the tire correctly, inspect the ground, and stay within the equipment’s limits.
If you reach that limit and your RV is still badly off-level, repositioning the rig is usually the better decision. Your RV manual and leveling equipment instructions should always take priority when their guidance differs.
Related FAQs
Can You Stack RV Leveling Blocks Six Inches High?
You should only stack RV leveling blocks six inches high if your specific product is designed and approved for that height. Many common systems have lower maximums, so check the manufacturer’s instructions before attempting it.
How Many RV Leveling Blocks Can You Stack?
There is no universal number because block thickness and stacking designs differ. Instead of counting blocks, follow the manufacturer’s maximum height and required stacking configuration.
Can I Stack Four RV Leveling Blocks?
Many interlocking leveling systems can use four or more individual blocks as part of a pyramid, but four blocks do not necessarily mean four vertical layers. Follow the recommended layout for your particular set.
Can RV Leveling Blocks Break?
Yes. RV leveling blocks can crack from excessive loads, aging, UV damage, freezing temperatures, poor ground support, rocks underneath them, or improper tire positioning. Replace damaged blocks rather than continuing to use them.
Can I Use Wood Instead of RV Leveling Blocks?
Yes, properly sized lumber can work for RV leveling when it is strong, wide enough for the tire, and arranged on firm ground. Avoid narrow stacks of cracked or deteriorated wood.
Can I Put Leveling Blocks Under Stabilizer Jacks?
You can often use suitable blocks or pads beneath stabilizer jacks when the equipment manufacturer allows it. Remember that stabilizer jacks normally reduce movement after leveling rather than serving as primary lifting jacks.
Can I Put Leveling Blocks Under Hydraulic Jacks?
Only use blocks beneath hydraulic leveling jacks when your RV and leveling-system instructions permit it. Jack requirements can differ significantly from the instructions for placing blocks beneath tires.
Do You Need Wheel Chocks When Using Leveling Blocks?
Yes, properly chock the RV according to its setup procedure after positioning it on leveling blocks. Leveling blocks raise the tire, while wheel chocks help prevent unwanted rolling.
Is It Safe to Leave an RV on Leveling Blocks Long Term?
It can be safe when the blocks are properly rated, correctly positioned, and sitting on stable ground. Check them periodically for cracking, movement, soil settling, and changes caused by weather.

Ryan Mitchell writes for readers who prefer independent travel and practical outdoor motorhome living. His how-to guides and reviews focus on simplicity, durability, and real value. He brings a calm, hands-on perspective to every topic.