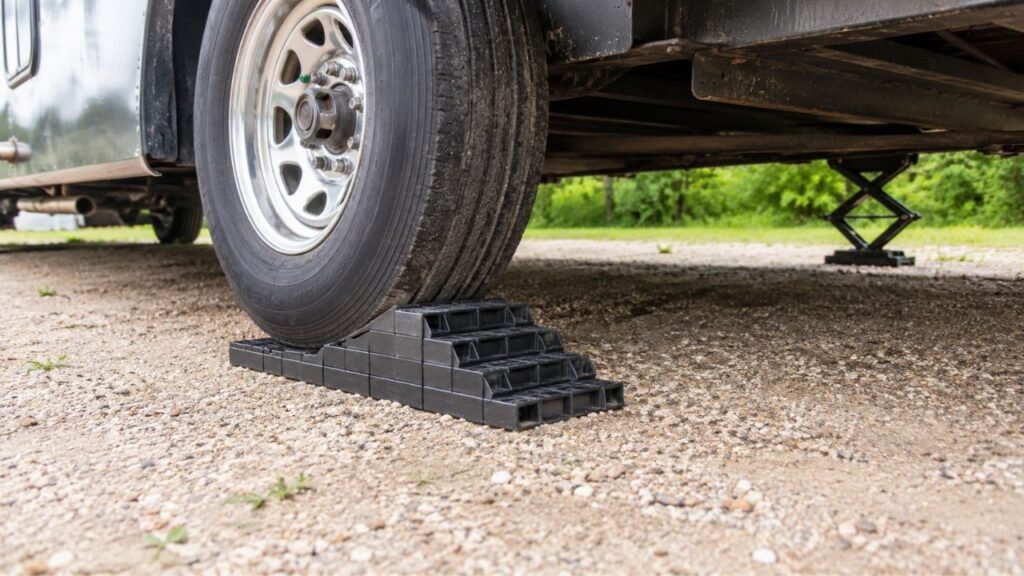
RV leveling blocks work by creating a raised platform under the tires on the low side of your RV. You slowly drive onto the blocks, which lifts that side until the RV sits level from side to side.
The idea is simple, but placement and stacking matter. Below, I’ll show you how leveling blocks work, how to use them safely, and what mistakes you should avoid.
Key Takeaways
- RV leveling blocks raise the low side of your RV.
- Stackable blocks create different heights for uneven campsites.
- Build blocks into a gradual step instead of a tall tower.
- Keep the tire properly centered and supported on the blocks.
- Level towable RVs side to side before front to back.
- Use wheel chocks after reaching your final position.
- Stabilizer jacks reduce movement but usually should not lift the RV.
- Always follow your RV and leveling-block manufacturer instructions.
What Are RV Leveling Blocks?
RV leveling blocks are portable platforms designed to raise part of your RV when the campsite is uneven.
Most are made from heavy-duty plastic and connect together. You can use one layer for a small adjustment or stack several layers when more height is needed.
Think of them as temporary extensions of the ground. Instead of letting one side of your RV sit lower, you create a higher surface for those tires.
Some blocks resemble large interlocking squares. Others use a curved ramp design. Both styles accomplish the same basic goal.
They should not be confused with wheel chocks. Chocks prevent rolling, while leveling blocks change the height of the RV.
They are also different from stabilizer pads. Stabilizer pads sit under jack feet and help spread the load across the ground.
How Do RV Leveling Blocks Work?
Leveling blocks do not mechanically lift your RV. Instead, they give the tires on the low side a higher surface to sit on. Understanding this basic principle makes the entire leveling process easier.
They Raise the Low Side of the RV
Imagine your campsite slopes downward toward the driver’s side.
The driver’s side tires sit lower than the passenger-side tires. As a result, the entire RV leans toward the driver’s side.
You place leveling blocks under those lower tires. Driving onto the blocks raises that side of the RV.
Once both sides reach approximately the same height, the RV becomes level.
The exact amount of lift depends on the campsite slope and block thickness.
Sometimes one layer solves the problem. Other campsites may require several layers.
Stacked Blocks Create a Gradual Ramp
Stackable RV leveling blocks usually work best when arranged like steps.
For example, the bottom layer might contain several blocks. The next layer contains fewer blocks, followed by another smaller layer.
This creates a gradual climbing surface for the tire.
A stepped arrangement is usually much safer than stacking blocks vertically like a tower. The tire can climb gradually instead of hitting a high edge.
Your particular blocks may have specific stacking instructions. Follow those instructions rather than assuming every brand works identically.
The Tires Transfer Weight Into the Blocks
Once your RV tire rests on the leveling blocks, part of the RV’s weight transfers through that tire into the blocks.
The blocks then transfer that load into the ground below.
That is why both block placement and ground condition matter.
A block sitting on firm concrete usually behaves predictably. The same block sitting on wet, soft soil may sink or tilt.
The tire also needs enough support. Avoid leaving a large section of tread hanging beyond the block.
Whenever possible, keep the tire centered and fully supported according to the block manufacturer’s instructions.
RV Leveling Blocks vs. Ramps, Chocks, and Stabilizer Pads
Several RV accessories look similar but perform very different jobs. Knowing those differences can prevent unsafe setups and unnecessary frustration.
| Equipment | Main Purpose | Usually Goes Under | Raises the RV? | Prevents Rolling? |
| Stackable leveling blocks | Correct uneven height | Tires or approved jack points | Yes | No |
| Curved leveling ramps | Provide adjustable tire height | Tires | Yes | No |
| Wheel chocks | Prevent RV movement | Against tires | No | Yes |
| Stabilizer pads | Spread jack pressure | Jack feet | Not by themselves | No |
| Stabilizer jacks | Reduce movement after leveling | RV frame points | Usually not | No |
| Leveling jacks | Level or lift when designed for it | Approved frame locations | Yes | No |
One of the most common mistakes is expecting one accessory to do another accessory’s job.
Leveling blocks change height. Wheel chocks help stop rolling. Stabilizers help control movement after you are already level.
Your RV may have equipment designed differently, especially hydraulic or automatic systems. Your owner’s manual should always take priority.
Why Does an RV Need Leveling in the First Place?
Leveling is partly about comfort, but it also helps several RV systems operate as intended. You do not need perfection down to the smallest fraction, but you should stay within your RV and appliance manufacturers’ recommendations.
Important reasons include:
- Comfort: Sleeping and walking feel much better on a level floor.
- Cabinet doors: Doors and drawers are less likely to swing unexpectedly.
- Water drainage: Sinks and showers can drain more predictably.
- Slide operation: Many manufacturers recommend leveling before extending slides.
- Stabilization: Stabilizers work better after the RV is properly positioned.
- Absorption refrigerators: Some require reasonably level operation while parked.
The refrigerator point deserves extra attention.
Traditional RV absorption refrigerators can be more sensitive to being significantly out of level than residential-style compressor refrigerators.
Do not assume one universal allowable angle applies to every refrigerator. Check the refrigerator owner’s manual for the actual limits.
How to Use RV Leveling Blocks Step by Step
Using leveling blocks becomes straightforward once you follow the same routine each time. The goal is to make small, controlled adjustments instead of trying to fix everything in one move.
1. Choose the Best Position on the Campsite
Before unpacking anything, look carefully at the parking surface.
Sometimes moving forward or backward two feet can dramatically reduce the amount of leveling required.
Look for ground that is:
- Firm
- Relatively flat
- Free from deep holes
- Free from large rocks
- Away from soft mud whenever possible
Remove sticks, stones, or other debris from where your blocks will sit.
A small rock underneath a plastic block can create a concentrated pressure point and possibly damage it.
2. Determine Which Side Is Low
Check the RV from side to side first.
You can use a small bubble level, mounted RV level, or electronic leveling system.
Place a portable level on a surface you know is reasonably flat. Many people use the floor or a countertop.
If the bubble moves toward one side, determine which side needs to come upward.
Only raise the low side.
Do not automatically place blocks under every wheel.
3. Estimate How Much Height You Need
Next, estimate how far the low side needs to rise.
Start conservatively.
One layer might be enough for a mild slope. A steeper campsite may require additional layers.
Do not assume one leveling block always equals one inch of lift. Block dimensions vary between manufacturers.
Your first attempt does not need to be perfect.
It is safer to make small adjustments than to create an unnecessarily tall stack immediately.
4. Build the Blocks Into a Stable Ramp
If you use interlocking blocks, arrange them according to their instructions.
For multiple layers, you will usually create a stair-step pattern.
For example:
- A wide bottom layer
- A shorter second layer
- A smaller top layer
This gives the tire a gradual path upward.
Keep the entire assembly flat against the ground.
If blocks rock, twist, or sit partially over holes, reposition them before driving onto them.
Never exceed your block manufacturer’s maximum stacking recommendation.
5. Position the Blocks in the Tire’s Path
Place the blocks directly in front of or behind the tire you need to raise.
Which direction you use depends on where you have room to move.
Align the center of the blocks with the center of the tire.
This is especially important with wide RV tires.
If you have a tandem-axle trailer, make sure each block arrangement lines up correctly with its corresponding tire.
6. Slowly Drive Onto the Blocks
This is where patience matters most.
Start the RV or tow vehicle and move very slowly.
Avoid sudden acceleration.
If someone is guiding you, agree on clear hand signals before you begin.
The spotter should stay visible and well away from the tires.
Never allow anyone to place hands, feet, or tools near the blocks while the RV is moving.
Stop when the tire reaches the intended resting position.
Set the parking brake before getting out to inspect the setup.
7. Check the Tire Position
Walk around and examine each tire resting on blocks.
The tire should sit securely on the supporting surface.
Avoid leaving a significant portion of the tire hanging beyond the block.
Check that:
- Blocks remain interlocked.
- Blocks have not shifted sideways.
- The tire is centered.
- The ground has not sunk.
- Nothing appears cracked or distorted.
If anything looks questionable, drive off and correct it.
Do not try to reposition blocks underneath a loaded tire.
8. Recheck the RV Level
Go back inside and check your level again.
If the low side still needs more height, drive off the blocks and add another appropriate layer.
If you raised the RV too much, remove some height.
It may take two or three attempts at an unfamiliar campsite.
That is completely normal.
After using leveling blocks several times, estimating the required height becomes much easier.
9. Secure the RV With Wheel Chocks
Once the RV reaches its final position, secure it properly.
For a motorhome, place the transmission in Park and apply the parking brake according to the manufacturer’s procedure.
For a travel trailer or fifth wheel, properly placed wheel chocks are especially important before unhitching.
Leveling blocks do not replace wheel chocks.
Even a properly leveled trailer can roll if it is not secured.
10. Finish Front-to-Back Leveling and Stabilization
Towable RVs are usually leveled side to side with the tires first.
After that, you can handle the front-to-back adjustment.
A travel trailer typically uses its tongue jack.
A fifth wheel normally uses its front landing gear.
Once everything is level, deploy the stabilizer jacks according to your owner’s manual.
Stabilizers should generally make firm contact without trying to lift the RV.
Where Should Leveling Blocks Sit Under an RV Tire?
The tire should sit securely on the usable surface of the leveling block.
Try to center the tire instead of stopping with the tread resting on an edge.
I would also avoid deliberately leaving a large portion of the tire unsupported.
Your block manufacturer may provide specific recommendations based on tire width and block dimensions. Follow those instructions whenever available.
Also inspect the blocks from the side.
The bottom blocks should sit flat against the campsite surface.
If one block is tilted because of a rock, rut, or soft patch, the entire stack may become unstable.
Whenever you are unsure about the tire position, driving off and rebuilding the platform is safer than hoping it will hold.
How Do You Use Leveling Blocks on a Tandem-Axle Trailer?
Tandem-axle trailers require more planning because you have two tires on each side.
If one entire side of the trailer needs raising, you will normally create support for both tires on that side.
Measure the available space between the tires before building your ramps.
You need enough room for each block arrangement without forcing the blocks into each other.
Try to create similar support heights for both tires when raising the complete side.
The goal is to support the trailer properly rather than forcing one tire to carry an unusual amount of load.
Check the instructions for your specific trailer and leveling blocks. Suspension designs and tire spacing can vary considerably between trailers.
If your setup requires unusual tire lifting or leaves one wheel unsupported, consult the trailer manufacturer before proceeding.
Does the Process Change for Travel Trailers, Fifth Wheels, and Motorhomes?
The basic principle stays the same, but different RV types use different equipment after side-to-side leveling. Knowing the difference will prevent you from using the wrong jack for the job.
Travel Trailers
With a travel trailer, I would normally level in this order:
- Level the trailer side to side using the tires.
- Secure the wheels with proper chocks.
- Unhitch according to your normal procedure.
- Use the tongue jack for front-to-back leveling.
- Deploy the stabilizer jacks.
The tongue jack is designed to control the front height.
The corner stabilizers generally should not be used to force the trailer level.
Fifth Wheels
Fifth wheels follow a similar process.
First, level the trailer from side to side using appropriate tire support.
After the wheels are secured and the trailer is disconnected, use the front landing gear to adjust front-to-back level.
Then deploy the remaining stabilizing equipment.
Always follow the fifth-wheel manufacturer instructions because leveling systems vary.
Motorhomes
Motorhomes can require blocks under front tires, rear tires, or one complete side.
It depends on the direction of the slope.
Many larger motorhomes also have hydraulic or electric leveling systems.
In that situation, the manufacturer’s leveling procedure is especially important.
Do not assume a technique used on a travel trailer automatically applies to a Class A motorhome.
Can RV Leveling Blocks Be Used With an Auto-Level System?
Yes, leveling blocks can sometimes complement an automatic leveling system.
They may help when the campsite slope is greater than the automatic system can comfortably correct.
You may also use approved blocks or pads beneath jack feet to reduce how far the jacks need to extend.
However, automatic leveling systems vary considerably.
Some manufacturers allow certain wheel positions. Others provide specific warnings about lifting wheels off the ground.
Never place blocks beneath an automatic jack unless the block and leveling system are suitable for that purpose.
Also avoid manually overriding the system simply because the RV looks slightly uneven.
Read your auto-level system manual first.
If the system repeatedly reaches its extension limit, repositioning the RV may be safer than building increasingly tall block stacks.
How High Can You Stack RV Leveling Blocks?
There is no single safe maximum height that applies to every leveling block.
The limit depends on:
- Block design
- Manufacturer instructions
- Maximum load rating
- Tire size
- RV weight
- Ground condition
- Number of blocks
- Required ramp shape
Some block systems allow several layers. Others have much more restrictive stacking instructions.
Never rely on a campground rule such as “three blocks is always safe.”
Follow the product instructions instead.
Also use common sense.
If the platform becomes tall enough that driving onto it feels uncomfortable or unstable, stop and reconsider the campsite position.
Moving the RV to a flatter spot is often better than building a questionable tower.
How Many RV Leveling Blocks Do You Need?
There is no perfect number for every RV.
The amount you need depends on your axle configuration and camping conditions.
Consider:
- Whether your RV has single or tandem axles
- How many tires may need elevation
- Typical campsite slopes
- Your block thickness
- Whether blocks are used beneath approved jack feet
- Your manufacturer’s stacking limits
For a tandem-axle trailer, you may need substantially more blocks than someone leveling a small single-axle camper.
Carrying a few extra blocks can also be useful on unpredictable campsites.
Just remember that owning more blocks does not mean you should stack them all together.
Can You Put Leveling Blocks Under Stabilizer Jacks?
Sometimes leveling blocks or purpose-built pads can be used underneath stabilizer feet.
Their job in that position is usually to create a wider base and reduce jack extension.
They may also help prevent stabilizer feet from sinking into dirt or grass.
However, putting blocks beneath a stabilizer does not turn that stabilizer into a lifting jack.
If the stabilizer is only designed to reduce movement, continue using it only for stabilization.
Check your RV manual before applying substantial lifting force through any stabilizer.
This is especially important on lightweight travel trailers where stabilizer mounting points may not be designed to lift the frame.
Do Leveling Blocks Work on Grass, Gravel, Dirt, and Concrete?
RV leveling blocks can work on most common campsite surfaces, but the ground underneath them determines how stable the setup remains. Check the area carefully before adding weight.
- Concrete: Usually provides the most predictable surface. Make sure the blocks cannot slide.
- Gravel: Flatten loose gravel and remove larger stones underneath the blocks.
- Grass: Check the soil beneath the grass for softness or moisture.
- Dirt: Use care if the surface looks loose or recently disturbed.
- Sand: Expect more sinking and consider a wider approved base.
- Mud: Repositioning is often better than building a stack on unstable soil.
Always inspect your setup again after the RV has been parked for a while.
Soft ground can settle beneath a loaded block.
Rain can also turn a previously firm campsite into a much softer surface.
Common RV Leveling Block Mistakes to Avoid
Leveling blocks are simple tools, but a few mistakes can make them unstable. Most problems happen because the blocks are rushed, overloaded, or placed on poor ground.
Avoid these mistakes:
- Building a tall vertical tower instead of a proper ramp.
- Driving onto the blocks too quickly.
- Using cracked or heavily damaged blocks.
- Exceeding the manufacturer’s load rating.
- Exceeding the approved stack height.
- Leaving too much tire tread unsupported.
- Placing blocks directly over rocks or holes.
- Using blocks on soft ground without checking for sinking.
- Forgetting to use wheel chocks.
- Trying to move blocks while the tire is resting on them.
- Using stabilizer jacks as lifting jacks.
- Ignoring automatic leveling system warnings.
- Standing too close to the tires while someone moves the RV.
- Extending slides before following your RV’s leveling procedure.
If something feels unstable during setup, stop and rebuild it.
Saving two minutes is never worth damaging a tire, leveling block, jack, or RV frame.
Why Are My Leveling Blocks Sinking, Sliding, or Cracking?
Problems with leveling blocks usually point to the ground, block condition, placement, or excessive loading. The good news is that most problems can be corrected before they become serious.
Blocks Keep Sinking Into the Ground
Soft soil is the most common reason.
The RV puts a tremendous amount of weight onto relatively small contact areas.
If the campsite is wet, sandy, or muddy, the blocks may slowly press into the ground.
You may need a wider approved base beneath them or a firmer campsite position.
Check the blocks again after rain.
A setup that looked perfect during arrival can settle several hours later.
Blocks Slide When I Drive Onto Them
Blocks can slide on loose gravel, smooth concrete, or uneven ground.
Sudden acceleration makes the problem worse.
Drive slowly and smoothly.
Make sure the blocks sit flat before approaching them.
If your manufacturer offers an approved grip mat or anti-slip accessory, it may help on slippery surfaces.
Never ask someone to hold the leveling block in place while you drive onto it.
Leveling Blocks Keep Cracking
Cracking can happen for several reasons.
The block may be old, damaged, overloaded, or resting on a sharp rock.
Incorrect stacking can also concentrate load into a smaller area than intended.
A tire sitting partially off the block can create additional stress.
Inspect your blocks before every setup.
If you notice deep cracks, deformation, broken locking tabs, or severe fading and brittleness, replacing the damaged block is usually the safest option.
The RV Is Level but Still Shakes
This confuses many first-time RV owners.
Level and stable are not the same thing.
Your leveling blocks can make the floor perfectly level while people walking inside still cause movement.
Once the RV is level, check your stabilizer jacks.
Make sure they are firmly positioned on solid ground.
Also check your wheel chocks and the ground beneath your stabilizer pads.
Do not keep adding height under the tires simply because the RV feels shaky.
When Should You Stop Adding Blocks and Reposition the RV?
Sometimes the safest leveling solution is moving the RV.
You should consider repositioning when:
- The required stack exceeds manufacturer limits.
- The blocks cannot sit flat.
- The ground keeps sinking.
- The tire cannot be properly supported.
- The approach angle feels unsafe.
- The RV would sit excessively high on one side.
- The leveling system reaches its safe operating limit.
- The campsite slope is clearly beyond the block system’s capability.
- You are unsure whether your setup is approved.
Try moving a few feet forward or backward first.
You may find a much flatter portion of the same campsite.
Changing the RV’s orientation can sometimes reduce the slope as well.
Are RV Leveling Blocks Worth Carrying If Your Campsites Are Usually Level?
Yes. I would still keep a set in the RV.
Even paved campsites are rarely perfectly level.
Older concrete pads can settle. Gravel can shift. Dirt campsites can develop depressions from previous RV tires.
Leveling blocks also take up relatively little storage space compared with many other RV accessories.
Even if your RV has automatic leveling, approved blocks may still be useful when dealing with uneven terrain or excessive jack extension.
Think of them as inexpensive backup equipment.
You may not use them at every campsite, but you will appreciate having them when you need them.
Final Words
RV leveling blocks work because they give the low tires a higher surface to rest on. Once those tires rise, the low side of the RV rises with them.
The actual process is straightforward: identify the low side, build a stable platform, drive onto it slowly, recheck your level, and secure the RV.
What matters most is resisting the temptation to improvise unsafe setups. Keep the tire properly supported, respect your block’s weight and stacking limits, and pay attention to the ground underneath.
Your RV owner’s manual and leveling-system instructions should always have the final say. Different rigs use different frames, jacks, suspension systems, and leveling equipment.
Once you have leveled your RV a few times, the process becomes much faster. The goal is not to rush it. The goal is to create a stable setup you can comfortably trust throughout your stay.
Related FAQs
Do RV Leveling Blocks Go in Front of or Behind the Tires?
They can go in front of or behind the tires depending on which direction you have room to move. Align the blocks directly with the tire path and slowly drive or back onto them.
Do You Need Leveling Blocks Under Both Tires on a Tandem Axle?
If you are raising one complete side of a tandem-axle trailer, you will generally provide suitable support for both tires on that side. Follow your trailer and leveling-block manufacturer’s instructions for your exact setup.
Can You Stack RV Leveling Blocks?
Yes, stackable RV leveling blocks are specifically designed to create different heights. Build them according to the manufacturer’s pattern and never exceed the recommended stacking limit.
How Many Leveling Blocks Should I Carry?
The right number depends on your RV size, axle configuration, and normal camping conditions. Tandem-axle trailers often require more blocks than smaller single-axle campers.
Can RV Leveling Blocks Break?
Yes. Blocks can crack from excessive weight, age, incorrect stacking, sharp rocks underneath, or poor tire placement. Inspect them regularly and replace damaged blocks before using them again.
Should the Entire RV Tire Sit on the Leveling Block?
The tire should be properly supported and centered on the usable block surface. Avoid leaving a large section of tread unsupported, and follow the leveling-block manufacturer’s tire-placement instructions.
Can I Use Wood Instead of RV Leveling Blocks?
Suitable wood is sometimes used for leveling, but it can split, absorb water, and become bulky. Purpose-built leveling blocks are usually lighter and easier to stack consistently.
Can You Use Leveling Blocks Under RV Jacks?
Some leveling blocks or pads can be used beneath approved jack feet to spread weight or reduce extension. Confirm that the block and jack manufacturers permit the setup before placing blocks underneath them.
Do I Need Wheel Chocks With Leveling Blocks?
Yes, particularly with towable RVs. Leveling blocks adjust height, while wheel chocks help prevent rolling. One should not be treated as a replacement for the other.
Can Leveling Blocks Stop an RV From Shaking?
Leveling blocks can improve the RV’s position, but they do not completely eliminate movement. Stabilizer jacks, wheel chocks, and solid ground usually play a larger role in reducing shaking.
Should I Level My RV Before Extending the Slides?
In most cases, you should level the RV before extending the slides, but procedures vary between manufacturers. Follow your RV owner’s manual for the correct sequence.
Do I Still Need Leveling Blocks With Auto Level?
Possibly. Leveling blocks can sometimes reduce excessive jack extension or help on uneven campsites. Always confirm the recommended procedure for your particular automatic leveling system.
How Level Does an RV Refrigerator Need to Be?
It depends on the refrigerator type and manufacturer. Absorption refrigerators can be more sensitive to significant off-level operation, so follow the refrigerator owner’s manual rather than relying on a universal angle.

Ryan Mitchell writes for readers who prefer independent travel and practical outdoor motorhome living. His how-to guides and reviews focus on simplicity, durability, and real value. He brings a calm, hands-on perspective to every topic.